Download
Seahawk Files (Eclipse Plugin + Importers).Deployment Instructions
In this tutorial we are going to install all the infrastructure needed by Seahawk to correctly work. This will required Apache Tomcat, Apache Solr a relational database (PostgreSQL or MySQL) and, obviously, Eclipse IDE with the plugin's jar file of Seahawk.
Preliminary Software Installation
Apache Tomcat and Apache Solr installation
The first step concerns the installation of the search engine. Seahawk relies on Apache Solr as a search engine. To install it you need to first download and install Tomcat. Then, you need to download and install Solr. Follow the tutorial on how to install it here.
Apache Solr Configuration
Once you get your Solr installation working, you need to configure the schema for Seahawk and some other files (e.g. stopwords.txt) involved by the filters used by the schema itself. Download the archive containing all the importers, scripts and files needed. Take the files needed in the solr_conf_files directory and copy them in the /conf directory inside your Solr home directory.
Database Installation
In the next step we will import the xml data into a database to reconstruct the original database of a stack exchange web site. The tools we will provide supports both MySQL and PostgreSQL.
First of all, create a database (e.g. stack_overflow) and then run the scripts in the database_scripts folder to generate the tables needed. In the archive you will find two scripts, one for MySQL and one for PostgreSQL. Use the one depending on the installation you made. As you will notice in the next step, the stack exchange dump provides data for all the website in its network (e.g. gamedev.stackexchange.com, stackoverlow.com etc...). You need to create one database for every site you want to import and use with Seahawk.
Data Pre-processing
Download the Stack Exchange Public Dump
In the second step, you need to get the Stack Exchange Dump that will provide the xml files needed to process the documents.
In the dump there are all the data concerning all the websites in the stack exchange network. That means that you will find more than the solely stackoverflow.com. However, int this tutorial we are going to just import the stackoverflow.com data dump but you can repeat the same steps also to import gamedev.stackexchange.com dump.
Import the xml data to PostgreSQL/MySQL
In the previous step you created the database and the related tables for stackoverflow.com. Now, it's time to populate the tables with the dump's data. First of all, deflate the 7zip files for stackoverflow.com, and locate three files: posts.xml, users.xml and comments.xml. When you got those files' location, run xml_importer.jar you can find it in the importers folder. Run it using the following options:
 -a,--database_address   database address (e.g. 127.0.0.1, localhost or mydbserver.org) default: localhost
 -c,--comments_xml       path to comments.xml
 -d,--database           database name
 -h,--help               display help information
 -o,--database_port      database port (default 5432)
 -p,--posts_xml          path to posts.xml
 -s,--database_user      database name
 -t,--database_type      database type: 'mysql'(MySQL) or 'pgsql' (Postgresql). Default: pgsql
 -u,--users_xml          path to users.xml
 -v,--votes_xml          path to votes.xml
 -w,--database_pwd       database password
Please note that the import phase takes about 5/6 hours to complete on a MacBook Pro (RAM: 4 Gb, CPU: 4 cores). This is due to the huge amount of data to process (more than 2 millions of documents in the December'11 dump). Regarding the JVM options, the tool must be used at least with 4 Gb of heap size (-Xmx4G option) or the tool is going to fail due to memory limitation otherwise.
Solr indexing and documents generation
When the xml importer tool has finished, we need to reconstruct the documents from the database and to index them in Solr that we have installed previously. Therefore, run solr_importer.jar you can find in the importers folder as follows:
java -jar <jvm options> solr_importer.jar <solr_url> <stack_exchange_site: stackoverflow or gamedev> <db_name> <db_user> <db_password> <db_address> <db_port> <db_type: mysql or pgsql>
Please note that this phase is going to take 7/8 hours on a powerful machine (e.g. 8 cores, 8Gb RAM).
Plug-in configuration
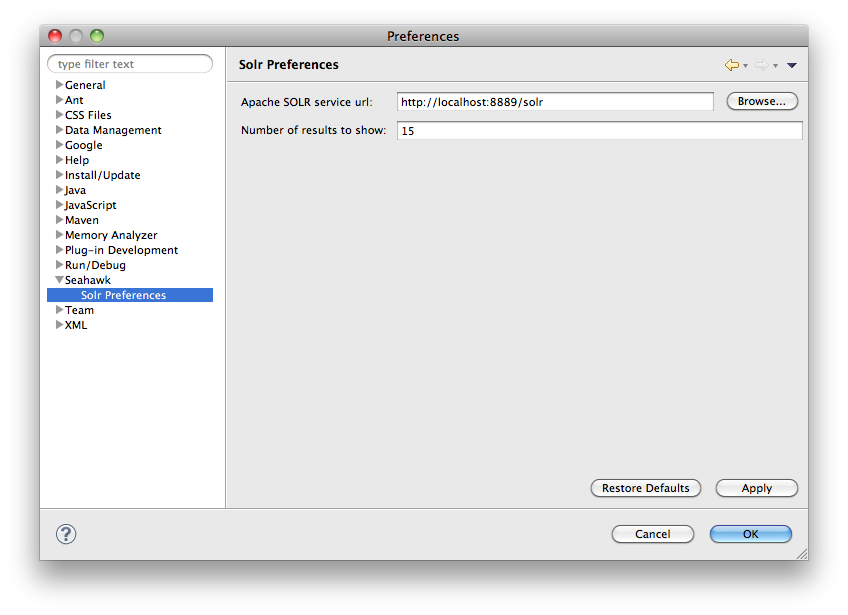
Solr Prefrences
Once the documents importing phase has done, copy ch.usi.inf.seahawk_1.0.0.jar into the eclipse's plugin folder. When you launch Eclipse for the first time, you will be asked to restart it. Do it in order to avoid Seahawk's undesired behaviors. After having restarted Eclipse, as requested by the plugin, go to the Eclipse's preference panel where you can find the Seahawk's panel. As shown in the image below, you can setup some preferences for Solr. Put the right URL where the Solr service is working such that Seahawk can communicate with it. You can also set the size of the result set to retrieve which is 50 by default.
As shown in the image below, in the main Seahawk's preference panel you can set up the name of the author that will be used by Seahawk in the annotations. you can choose between a custom username or to let the plug-in use the Eclipse username, that is, the value set in the "USER" system environment variable.
Seahawk's annotation preferences
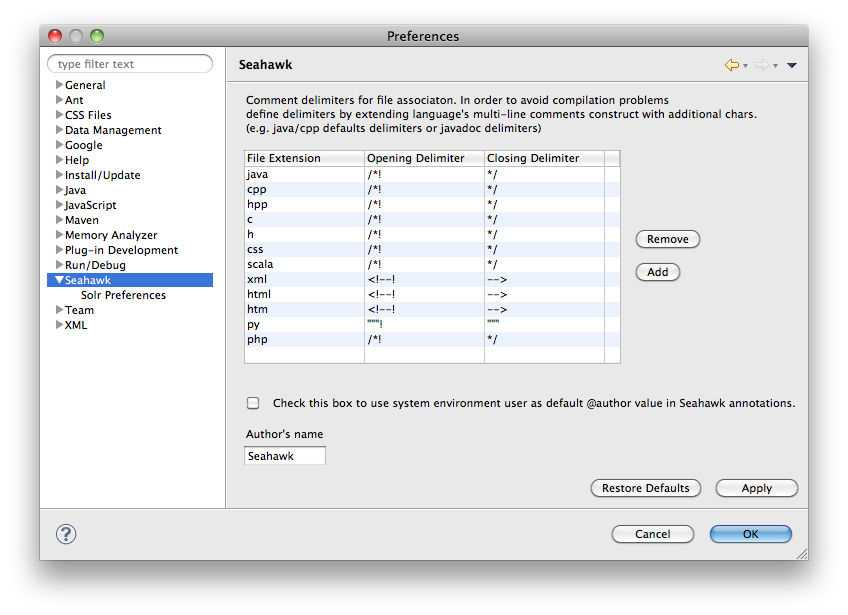
Seahawk provides an annotation system to put bookmarks directly into the code. As shown in the image above, annotations delimiters can be customized in order to create new annotations for language not supported by default. In order not to compromise source code compilation, delimiters must be an extension of the multiline comments for a language. For example, if we consider Java, we know that delimiters for multiline comments are /* and */. By default, Seahawk extends those delimiters by using /*! and */ to delimit its own annotations in Java. Moreover, in the annotation is present a @author tag. From the preference panel above, an user can decide if customize the author's name or using the one provided by system environmental variables (e.g. the one used by eclipse).